This application will allow a mobile boarding pass to be shown on your device, even if your airline doesn't support smartwatches. When you arrive at the airport, there will be a card on your watch, waiting for you at the gate to board your plane.
This technology is quite new to airlines and even the best of the best haven't quite got it nailed down yet. You can do it with the power of your own two fingers, any Aztec/PDF417/QR boarding pass and, the very approximate location of the airport.
The user will set the location and boarding pass information using two very renowned programs called "AutoLocation" that will help you set these "geofences" then, scan (or take a screenshot and import) the boarding passes in "
Wear Codes
". The day of the flight, your Geofence monitor activates, when you arrive at the airport, the card is shown to scan at the gate.
The instructions are quite simple:
-Install and run
Wear Boarding for Android Wear
-Install the required programs (mentioned above, but will auto-install once you run this app)
In AutoLocation:
-Manage Geofences
-Press the "+" symbol to add a geofence
-Enter the lattitude and longitude or airport address and press the magnifying glass at the end of the search line.
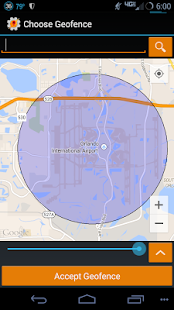
-Use the plus symbol in the map area to zoom in. The airport should be visible.
-Click on somewhere near the airport, a blue dot will appear
-On the blue slider below the map, engulf the entire airport area in the lightly shaded area.
-If the lightly shaded area doesn't cover the entire airport when you slide the slider all the way to the right, press the down icon at the end of the slider and enter a figure such as 1000.
-After the airport area is totally engulfed in the shaded area, press "Accept Geofence" and name it "Airport 1"
Repeat this process for each airport you'll be boarding another airplane on and make sure to change the name by adding 1 to each new airport (e.g. Airport 2)
In Wear Codes:
Option 1:
-Take a screenshot of your boarding pass on your airline's mobile app.
-View this picture in your favorite picture viewer
-Share this picture with "Wear Codes" with the share icon (3 trianglular lines with a dot on each axis)
-Wear Codes may import it without a crop, or will ask you to encapsulate the code in a box.
-Name this code "Airport 1" and, if you are in the US, use the dropdown box to select Aztec (if it isn't already)
-Save this by pressing on the check mark near the top of the screen.
Repeat this process for each boarding pass, add 1 to each code (e.g. Airport 2)
Option 2:
-Display the printed boarding pass on a computer monitor
-Open Wear Codes
-Press the "+" button.
-Press "Scan a code"
-Aim your camera at the bar code and it will accept it when it fully reads it.
-Name your code "Airport 1"
-Press the dropdown to convert your code from PDF417 to Aztec.
-Press the checkmark on the top to accept the code.
Repeat this process for each boarding pass, add 1 to each code (e.g. Airport 2)
Finally, run this program to specify your flight dates.. After this, you'll be all set.
Support for frequent flyers:
To avoid redoing geofences, you can now name your frequent airports and boarding passes with a naming scheme such as:
DAB-Airport 1
DAB - Airport 1
DAB- Airport 1
DAB -Airport 1
Or:
Airport 1- DAB
Airport 1 -DAB
Airport 1-DAB
Airport 1 - DAB
You can use airport codes, airport names, whatever you choose.
Just remember, each airport geofence references the same boarding pass. Name them alike, you'll be able to fly the skies without the need to expose your pattern or pin!
Questa applicazione vi permetterà una carta d'imbarco mobile per essere mostrato sul dispositivo, anche se la compagnia aerea non supporta smartwatches. Quando si arriva in aeroporto, ci sarà una scheda sul vostro orologio, vi aspetta al cancello a bordo l'aereo.
Questa tecnologia è abbastanza nuovo alle compagnie aeree e anche il meglio del meglio hanno non proprio capito bene inchiodato ancora. Puoi farlo con la forza delle proprie due dita, qualsiasi / PDF417 / QR carta di imbarco e azteca, la posizione molto approssimativa dell'aeroporto.
L'utente imposta la posizione e l'imbarco passare informazioni utilizzando due programmi molto noti chiamati "Autolocation" che vi aiuterà a creare questi "geofences", quindi, eseguire la scansione (o prendere uno screenshot e importazione) la carta d'imbarco in "
Codici Indossare
". Il giorno del volo, il monitor Geofence attiva, quando si arriva in aeroporto, viene mostrata la carta per la scansione al cancello.
Le istruzioni sono molto semplici:
-Installare Ed eseguire
Wear Imbarco per Android Wear
-Installare I programmi richiesti (di cui sopra, ma si auto-installa una volta che si esegue questa applicazione)
In Autolocation:
Geofences -Gestire
-Premere Il simbolo "+" per aggiungere un geofence
Immettere l'indirizzo lattitude e longitudine o all'aeroporto, premete la lente d'ingrandimento alla fine della linea di ricerca.
-Usa Il segno + l'area della mappa per ingrandire. L'aeroporto deve essere visibile.
-Clicca Da qualche parte nei pressi dell'aeroporto, apparirà un puntino blu
-Sulla Cursore blu sotto la mappa, inghiottire l'intera area dell'aeroporto in zona leggermente ombreggiata.
-Se La zona leggermente ombreggiata non copre l'intero aeroporto quando si fa scorrere il cursore tutto a destra, premere l'icona in basso al termine del cursore e inserire una figura come 1000.
-Dopo L'area dell'aeroporto è totalmente inghiottito nella zona ombreggiata, premere "Accetta Geofence" e il nome "Aeroporto 1"
Ripetere questo processo per ogni aeroporto sarete imbarcando un altro aereo e assicurarsi di cambiare il nome con l'aggiunta di 1 ad ogni nuovo aeroporto (ad esempio Aeroporto 2)
In Codici usura:
Opzione 1:
Prendete uno screenshot della vostra carta d'imbarco sul mobile app della vostra compagnia aerea.
-Visualizza Questa immagine nel visualizzatore immagine preferita
-Condividere Questa immagine con "Wear Codes" con l'icona di condivisione (3 linee triangolare con un punto su ogni asse)
Codici -Wear possono importare senza una coltura, o ti chiederà di incapsulare il codice in una scatola.
-name Questo codice "Airport 1" e, se negli Stati Uniti, usa la casella a discesa per selezionare azteco (se non lo è già)
-Salvare Questo premendo sul segno di spunta vicino alla parte superiore dello schermo.
Ripetete questa procedura per ogni carta d'imbarco, aggiungere 1 a ogni codice (ad esempio Aeroporto 2)
Opzione 2:
-display Della carta d'imbarco stampata su un monitor di un computer
Codici usura -Open
-Premere Il tasto "+".
Premere "Scansione di un codice"
-Aim La fotocamera sul codice a barre e lo accetterà quando legge pienamente.
-name Tuo codice "Airport 1"
-Premere Il menu a discesa per convertire il codice da PDF417 Aztec.
-Premere Il segno di spunta in alto per accettare il codice.
Ripetete questa procedura per ogni carta d'imbarco, aggiungere 1 a ogni codice (ad esempio Aeroporto 2)
Infine, eseguire questo programma per specificare le date del volo .. Dopo questo, sarai a posto.
Supporto per frequent flyer:
Per evitare rifare geofences, è ora possibile assegnare un nome ai aeroporti frequenti e carte d'imbarco con uno schema di denominazione come ad esempio:
DAB-Airport 1
DAB - Aeroporto 1
DAB- Airport 1
DAB -Airport 1
Oppure:
Aeroporto 1- DAB
Aeroporto 1 -DAB
Airport 1-DAB
Airport 1 - DAB
È possibile utilizzare i codici aeroportuali, i nomi e per l'aeroporto, quello che vuoi.
Basta ricordare, ogni Geofence aeroporto fa riferimento la stessa carta d'imbarco. Nome loro allo stesso modo, sarete in grado di volare nei cieli, senza la necessità di esporre il vostro modello o pin!