This application will allow a mobile boarding pass to be shown on your device, even if your airline doesn't support smartwatches. When you arrive at the airport, there will be a card on your watch, waiting for you at the gate to board your plane.
This technology is quite new to airlines and even the best of the best haven't quite got it nailed down yet. You can do it with the power of your own two fingers, any Aztec/PDF417/QR boarding pass and, the very approximate location of the airport.
The user will set the location and boarding pass information using two very renowned programs called "AutoLocation" that will help you set these "geofences" then, scan (or take a screenshot and import) the boarding passes in "
Wear Codes
". The day of the flight, your Geofence monitor activates, when you arrive at the airport, the card is shown to scan at the gate.
The instructions are quite simple:
-Install and run
Wear Boarding for Android Wear
-Install the required programs (mentioned above, but will auto-install once you run this app)
In AutoLocation:
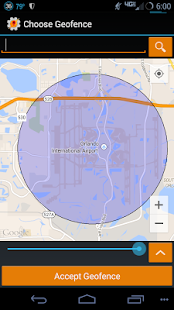
-Manage Geofences
-Press the "+" symbol to add a geofence
-Enter the lattitude and longitude or airport address and press the magnifying glass at the end of the search line.
-Use the plus symbol in the map area to zoom in. The airport should be visible.
-Click on somewhere near the airport, a blue dot will appear
-On the blue slider below the map, engulf the entire airport area in the lightly shaded area.
-If the lightly shaded area doesn't cover the entire airport when you slide the slider all the way to the right, press the down icon at the end of the slider and enter a figure such as 1000.
-After the airport area is totally engulfed in the shaded area, press "Accept Geofence" and name it "Airport 1"
Repeat this process for each airport you'll be boarding another airplane on and make sure to change the name by adding 1 to each new airport (e.g. Airport 2)
In Wear Codes:
Option 1:
-Take a screenshot of your boarding pass on your airline's mobile app.
-View this picture in your favorite picture viewer
-Share this picture with "Wear Codes" with the share icon (3 trianglular lines with a dot on each axis)
-Wear Codes may import it without a crop, or will ask you to encapsulate the code in a box.
-Name this code "Airport 1" and, if you are in the US, use the dropdown box to select Aztec (if it isn't already)
-Save this by pressing on the check mark near the top of the screen.
Repeat this process for each boarding pass, add 1 to each code (e.g. Airport 2)
Option 2:
-Display the printed boarding pass on a computer monitor
-Open Wear Codes
-Press the "+" button.
-Press "Scan a code"
-Aim your camera at the bar code and it will accept it when it fully reads it.
-Name your code "Airport 1"
-Press the dropdown to convert your code from PDF417 to Aztec.
-Press the checkmark on the top to accept the code.
Repeat this process for each boarding pass, add 1 to each code (e.g. Airport 2)
Finally, run this program to specify your flight dates.. After this, you'll be all set.
Support for frequent flyers:
To avoid redoing geofences, you can now name your frequent airports and boarding passes with a naming scheme such as:
DAB-Airport 1
DAB - Airport 1
DAB- Airport 1
DAB -Airport 1
Or:
Airport 1- DAB
Airport 1 -DAB
Airport 1-DAB
Airport 1 - DAB
You can use airport codes, airport names, whatever you choose.
Just remember, each airport geofence references the same boarding pass. Name them alike, you'll be able to fly the skies without the need to expose your pattern or pin!
あなたの航空会社がsmartwatchesをサポートしていない場合でも、このアプリケーションは、モバイル搭乗券は、お使いのデバイスに表示されるようになります。あなたが空港に到着すると、あなたの飛行機に搭乗するゲートであなたを待って、あなたの時計にカードが存在します。
この技術は、航空会社に非常に新しいものであっても最高の最高は非常にそれがまだ釘付け持っていません。あなたは、あなた自身の二本の指の力、任意のアズテック/ PDF417コード/ QR搭乗券と、空港の非常におおよその位置でそれを行うことができます。
ユーザーは搭乗が "コードを着用してください」。あなたが空港に到着したときの飛行の日は、あなたのジオフェンスモニターがアクティブに、カードは、ゲートでスキャンすることが示されています。
命令は非常に簡単です:
-installとアンドロイドウェアのためのボーディング着用href="https://play.google.com/store/apps/details?id=com.tinozplace.wearboarding"> -install必要なプログラム(前述したが、あなたは、このアプリを実行した後、自動インストールされます)
オートロケーションの場合:
-manage Geofences
ジオフェンスを追加するには、「+」記号を - プレス
lattitudeと経度または空港アドレス-ENTERと検索行の末尾に拡大鏡を押してください。
マップエリアでのプラス記号が拡大し-USE。空港は、表示される必要があります。
空港近くのどこかに、キーを押しながらクリックし、青い点が表示されます
地図の下に青のスライダー-on、軽く陰影領域全体空港エリアを巻き込みます。
あなたはすべての方法には、スライダを右にスライドさせたときに軽く斜線部分は、空港全体をカバーしていない-IF、スライダの端にある下のアイコンを押して、1000年のような数字を入力します。
空港エリアは完全に網掛け領域に飲み込まれる-after、押して「ジオフェンスを受け入れる」と「空港1 "という名前を付けます
あなたが別の飛行機に搭乗することがあります各空港について、この手順を繰り返し、それぞれの新空港に1を加えた名前を変更してください(例:空港2)
着用コードの場合:
オプション1:
あなたの航空会社のモバイルアプリで搭乗券のスクリーンショットを-Take。
お好みの画像ビューアでこの絵を-view
共有アイコン(各軸上の点で3 trianglular線)で「コードを着用してください」とこの絵を-share
-Wearコードは、作物なしでそれをインポートすることができ、またはボックス内のコードをカプセル化するように求められます。
あなたは米国内にある場合、アステカを選択するドロップダウンボックスを使用し、このコード「空港1」を-nameと(それがまだない場合)
画面上部のチェックマークを押すことによってこれを-save。
各搭乗券にこの処理を繰り返し、各コードに1を加える(例えば空港2)
オプション2:
コンピュータモニタ上のプリント搭乗券を-display
- オープン着用コード
「+」ボタンを - プレス。
- プレス "コードをスキャン」
バーコードにカメラを-Aim、それは完全にそれを読み取ると、それを受け入れます。
あなたのコードを-name "空港1」
PDF417からアステカにコードを変換するためのドロップダウンを - プレス。
コードを受け入れるように上にチェックマークを - プレス。
各搭乗券にこの処理を繰り返し、各コードに1を加える(例えば空港2)
最後に、この後、あなたはすべてのセットになるだろう..フライトの日付を指定するには、このプログラムを実行します。
マイレージのサポート:
geofencesのやり直しを回避するために、今、あなたの頻繁に空港に名前を付けることができ、搭乗は、以下のような命名方式で渡します。
DAB-空港1
DAB - 空港1
DAB-空港1
DAB -Airport 1
または:
空港1- DAB
空港1 -DAB
空港1-DAB
空港1 - DAB
あなたが選択した任意の空港コード、空港名を、使用することができます。
ただ、各空港のジオフェンスは、同じ搭乗券を参照し、覚えています。同様に、それらに名前を付け、あなたのパターンやピンを露出させる必要なく、空を飛ぶことができるでしょう!