This application will allow a mobile boarding pass to be shown on your device, even if your airline doesn't support smartwatches. When you arrive at the airport, there will be a card on your watch, waiting for you at the gate to board your plane.
This technology is quite new to airlines and even the best of the best haven't quite got it nailed down yet. You can do it with the power of your own two fingers, any Aztec/PDF417/QR boarding pass and, the very approximate location of the airport.
The user will set the location and boarding pass information using two very renowned programs called "AutoLocation" that will help you set these "geofences" then, scan (or take a screenshot and import) the boarding passes in "
Wear Codes
". The day of the flight, your Geofence monitor activates, when you arrive at the airport, the card is shown to scan at the gate.
The instructions are quite simple:
-Install and run
Wear Boarding for Android Wear
-Install the required programs (mentioned above, but will auto-install once you run this app)
In AutoLocation:
-Manage Geofences
-Press the "+" symbol to add a geofence
-Enter the lattitude and longitude or airport address and press the magnifying glass at the end of the search line.
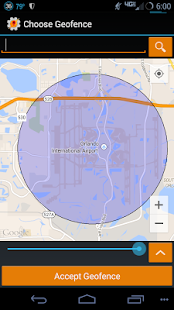
-Use the plus symbol in the map area to zoom in. The airport should be visible.
-Click on somewhere near the airport, a blue dot will appear
-On the blue slider below the map, engulf the entire airport area in the lightly shaded area.
-If the lightly shaded area doesn't cover the entire airport when you slide the slider all the way to the right, press the down icon at the end of the slider and enter a figure such as 1000.
-After the airport area is totally engulfed in the shaded area, press "Accept Geofence" and name it "Airport 1"
Repeat this process for each airport you'll be boarding another airplane on and make sure to change the name by adding 1 to each new airport (e.g. Airport 2)
In Wear Codes:
Option 1:
-Take a screenshot of your boarding pass on your airline's mobile app.
-View this picture in your favorite picture viewer
-Share this picture with "Wear Codes" with the share icon (3 trianglular lines with a dot on each axis)
-Wear Codes may import it without a crop, or will ask you to encapsulate the code in a box.
-Name this code "Airport 1" and, if you are in the US, use the dropdown box to select Aztec (if it isn't already)
-Save this by pressing on the check mark near the top of the screen.
Repeat this process for each boarding pass, add 1 to each code (e.g. Airport 2)
Option 2:
-Display the printed boarding pass on a computer monitor
-Open Wear Codes
-Press the "+" button.
-Press "Scan a code"
-Aim your camera at the bar code and it will accept it when it fully reads it.
-Name your code "Airport 1"
-Press the dropdown to convert your code from PDF417 to Aztec.
-Press the checkmark on the top to accept the code.
Repeat this process for each boarding pass, add 1 to each code (e.g. Airport 2)
Finally, run this program to specify your flight dates.. After this, you'll be all set.
Support for frequent flyers:
To avoid redoing geofences, you can now name your frequent airports and boarding passes with a naming scheme such as:
DAB-Airport 1
DAB - Airport 1
DAB- Airport 1
DAB -Airport 1
Or:
Airport 1- DAB
Airport 1 -DAB
Airport 1-DAB
Airport 1 - DAB
You can use airport codes, airport names, whatever you choose.
Just remember, each airport geofence references the same boarding pass. Name them alike, you'll be able to fly the skies without the need to expose your pattern or pin!
Deze toepassing zal een mobiele instapkaart op uw apparaat om te zien, zelfs als uw luchtvaartmaatschappij niet ondersteunt smartwatches. Wanneer je aankomt op de luchthaven, zal er een kaart op uw horloge, voor u klaar bij de poort om je vliegtuig te stappen.
Deze technologie is vrij nieuw voor luchtvaartmaatschappijen en zelfs de beste van het beste niet helemaal kreeg hij genageld nog naar beneden. U kunt dit doen met de kracht van je eigen twee vingers, elke Aztec / PDF417 / QR boarding pass en de geschatte locatie van de luchthaven.
De gebruiker zal stellen van de locatie en de instapkaart informatie met behulp van twee zeer gerenommeerde programma genaamd "autolocatie" die u zullen helpen deze "geofences" stel vervolgens, scannen (of neem een screenshot en import) de instapkaarten in "
Wear Codes
". De dag van de vlucht, uw Geofence beeldscherm activeert, wanneer je aankomt op de luchthaven, de kaart wordt getoond om te scannen bij de gate.
De instructies zijn vrij eenvoudig:
-install En uitvoeren
Draag Boarding voor Android Wear
-install De gewenste programma's (hierboven vermeld, maar zal automatisch installeren zodra je deze app draaien)
In autolocatie:
-beheer Geofences
-Druk Op de "+" symbool om een geofence voegen
Voer het Lattitude en lengtegraad of luchthaven adres en druk op het vergrootglas op het einde van de zoektocht lijn.
-Gebruik Het plusteken in het gebied op de kaart om in te zoomen. De luchthaven moet zichtbaar zijn.
-Klik Op ergens in de buurt van de luchthaven, wordt een blauwe stip weergegeven
-Op De blauwe schuiver onder de kaart, overspoelen de hele luchthaven gebied in het licht beschaduwde omgeving.
-Als De licht gearceerde gebied dekt niet de hele luchthaven wanneer je schuif de schuifregelaar helemaal naar rechts, druk op het pictogram aan het eind van de schuif en voer een figuur zoals 1000.
-Na De luchthaven gebied volledig wordt verzwolgen in het gearceerde gebied, druk op "Accepteren Geofence" en noem deze "Airport 1"
Herhaal dit proces voor iedere luchthaven zult u instappen ander vliegtuig op en zorg ervoor dat de naam te wijzigen door het toevoegen van 1 op elke nieuwe luchthaven (bijv Airport 2)
In Wear Codes:
Optie 1:
-Neem Een screenshot van je instapkaart op de mobiele app van uw luchtvaartmaatschappij.
-Bekijk Deze foto in uw favoriete foto-viewer
-Deel Dit beeld met "Draag Codes" met het pictogram aandeel (3 trianglular lijnen met een stip op elke as)
-Wear Codes kunnen importeren zonder een gewas, of zal u vragen om de code in te kapselen in een doos.
-Naam Deze code "Airport 1" en, als je in de VS, gebruik het uitklapmenu om Aztec te selecteren (als het niet al)
-Sla Dit door op het vinkje in de buurt van de bovenkant van het scherm.
Herhaal dit proces voor elke boarding pass, voeg 1 aan elke code (bijv Airport 2)
Optie 2:
-Display De afgedrukte instapkaart op een computer monitor
-Open Wear Codes
-Druk Op de knop "+".
Druk op "Scan een code"
-Aim Uw camera op de streepjescode en het zal accepteren als deze volledig leest.
-Naam Uw code "Airport 1"
-Druk Op de dropdown om uw code te converteren van PDF417 Aztec.
-Druk Op de vinkje aan de bovenkant om de code te accepteren.
Herhaal dit proces voor elke boarding pass, voeg 1 aan elke code (bijv Airport 2)
Tot slot, voer je dit programma om uw vlucht data opgeven .. Na deze, zult u klaar zijn.
Ondersteuning voor frequent flyers:
Om overdoen geofences te voorkomen, kunt u nu de naam van uw frequent luchthavens en instapkaart met een naamgeving zoals:
DAB-Airport 1
DAB - Luchthaven 1
DAB- Airport 1
DAB -Airport 1
Of:
Luchthaven 1- DAB
Luchthaven 1 -Dab
Luchthaven 1-DAB
Luchthaven 1 - DAB
U kunt de luchthaven codes, de luchthaven namen, wat je ook kiest te gebruiken.
Vergeet niet, elke luchthaven geofence verwijst naar dezelfde boarding pass. Noem ze gelijk, zult u in staat om de lucht te vliegen zonder de noodzaak om uw patroon of pen bloot!