This application will allow a mobile boarding pass to be shown on your device, even if your airline doesn't support smartwatches. When you arrive at the airport, there will be a card on your watch, waiting for you at the gate to board your plane.
This technology is quite new to airlines and even the best of the best haven't quite got it nailed down yet. You can do it with the power of your own two fingers, any Aztec/PDF417/QR boarding pass and, the very approximate location of the airport.
The user will set the location and boarding pass information using two very renowned programs called "AutoLocation" that will help you set these "geofences" then, scan (or take a screenshot and import) the boarding passes in "
Wear Codes
". The day of the flight, your Geofence monitor activates, when you arrive at the airport, the card is shown to scan at the gate.
The instructions are quite simple:
-Install and run
Wear Boarding for Android Wear
-Install the required programs (mentioned above, but will auto-install once you run this app)
In AutoLocation:
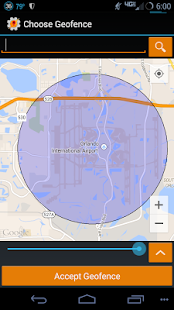
-Manage Geofences
-Press the "+" symbol to add a geofence
-Enter the lattitude and longitude or airport address and press the magnifying glass at the end of the search line.
-Use the plus symbol in the map area to zoom in. The airport should be visible.
-Click on somewhere near the airport, a blue dot will appear
-On the blue slider below the map, engulf the entire airport area in the lightly shaded area.
-If the lightly shaded area doesn't cover the entire airport when you slide the slider all the way to the right, press the down icon at the end of the slider and enter a figure such as 1000.
-After the airport area is totally engulfed in the shaded area, press "Accept Geofence" and name it "Airport 1"
Repeat this process for each airport you'll be boarding another airplane on and make sure to change the name by adding 1 to each new airport (e.g. Airport 2)
In Wear Codes:
Option 1:
-Take a screenshot of your boarding pass on your airline's mobile app.
-View this picture in your favorite picture viewer
-Share this picture with "Wear Codes" with the share icon (3 trianglular lines with a dot on each axis)
-Wear Codes may import it without a crop, or will ask you to encapsulate the code in a box.
-Name this code "Airport 1" and, if you are in the US, use the dropdown box to select Aztec (if it isn't already)
-Save this by pressing on the check mark near the top of the screen.
Repeat this process for each boarding pass, add 1 to each code (e.g. Airport 2)
Option 2:
-Display the printed boarding pass on a computer monitor
-Open Wear Codes
-Press the "+" button.
-Press "Scan a code"
-Aim your camera at the bar code and it will accept it when it fully reads it.
-Name your code "Airport 1"
-Press the dropdown to convert your code from PDF417 to Aztec.
-Press the checkmark on the top to accept the code.
Repeat this process for each boarding pass, add 1 to each code (e.g. Airport 2)
Finally, run this program to specify your flight dates.. After this, you'll be all set.
Support for frequent flyers:
To avoid redoing geofences, you can now name your frequent airports and boarding passes with a naming scheme such as:
DAB-Airport 1
DAB - Airport 1
DAB- Airport 1
DAB -Airport 1
Or:
Airport 1- DAB
Airport 1 -DAB
Airport 1-DAB
Airport 1 - DAB
You can use airport codes, airport names, whatever you choose.
Just remember, each airport geofence references the same boarding pass. Name them alike, you'll be able to fly the skies without the need to expose your pattern or pin!
출발은 smartwatches를 지원하지 않는 경우에도이 응용 프로그램은 모바일 탑승권이 장치에 표시 할 수 있습니다. 당신이 공항에 도착하면 비행기 탑승 게이트에서 당신을 기다리고, 시계의 카드가 될 것입니다.
이 기술은 항공사에 아주 새로운, 심지어 최고 중의 최고 꽤 아직 꼼짝 없어입니다. 당신은 당신의 자신의 두 손가락의 힘, 어떤 아즈텍 / PDF 417 / QR 탑승권과 공항의 매우 대략적인 위치와 함께 할 수 있습니다.
사용자는 HTTP "= 착용 코드 을". 공항에 도착하면 비행의 날, 당신의 지오 펜스 모니터 활성화, 카드는 게이트에서 스캔 표시됩니다.
지침은 매우 간단합니다 :
- 설치 및
에 대한 탑승 착용 href="https://play.google.com/store/apps/details?id=com.tinozplace.wearboarding">
필요한 프로그램 -install (위에서 언급 한,하지만 당신은이 응용 프로그램을 실행하면 자동 설치됩니다)
자동 위치에서 :
-manage 지오 펜스
지오 펜스를 추가 할 수있는 "+"기호 - 보도
그리고 lattitude와 경도 또는 공항 주소를 기입하십시오 검색 라인의 끝 부분에 돋보기를 누르십시오.
지도 영역에 더하기 기호가 확대 -USE. 공항은 볼 수 있어야합니다.
공항 근처 어딘가에에 - 클릭, 파란색 점이 나타납니다
지도 아래 파란색 슬라이더 -on, 가볍게 음영 지역 전체 공항 지역을 삼켜.
당신은 모든 방법 슬라이더를 오른쪽으로 밀면 가볍게 음영 지역이 전체 공항에는 적용되지 않습니다 - 만약, 슬라이더의 끝에서 아래 아이콘을 눌러 1000과 같은 숫자를 입력합니다.
공항 영역이 완전히 음영 지역에 휩싸입니다을 따 키를 눌러 "지오 펜스 승인"및 "공항 1"로 이름을
당신이 다른 비행기에 탑승 할 수 있습니다 각 공항에 대해이 과정을 반복하고 각각의 새로운 공항에 1을 추가하여 이름을 변경해야합니다 (예 : 공항 2)
착용 코드에서 :
옵션 1 :
출발의 모바일 앱에 전달 보딩의 스크린 샷을 -Take.
당신의 마음에 드는 사진 뷰어에서이 사진을 -보기
함께이 사진을 - 공유 공유 아이콘 "코드를 착용"(각 축에 점 3 trianglular 라인)
-Wear 코드는 작물없이 가져올 수있다, 또는 상자에 코드를 캡슐화하도록 요청합니다.
당신이 미국에있는 경우, 아즈텍 선택 드롭 다운 상자를 사용하여,이 코드 "공항 1"-name과 (아직없는 경우)
화면의 상단에있는 체크 표시를 눌러이 -SAVE.
각 탑승권에 대해이 과정을 반복 각 코드에 1을 추가 (예 : 공항 2)
옵션 2 :
컴퓨터 모니터에 인쇄 된 탑승권을 -display
- 오픈 착용 코드
"+"버튼을 - 보도.
- 보도 "코드 검색"
바코드에 카메라를 조준 - 그것은 완전히 읽을 때 그것을 받아 들일 것입니다.
코드를 -name "공항 1"
아즈텍에 PDF 417에서 코드를 변환 할 수있는 드롭 다운 - 보도.
코드를 받아 상단의 체크 표시를 - 보도.
각 탑승권에 대해이 과정을 반복 각 코드에 1을 추가 (예 : 공항 2)
마지막으로,이 후에는 모든 설정이 될 것입니다 .. 당신의 비행 날짜를 지정하려면이 프로그램을 실행합니다.
상용 고객 우대 프로그램에 대한 지원 :
지오 펜스를 재실행 방지하기 위해, 당신은 지금 당신의 빈번한 공항의 이름을 지정할 수 있습니다 탑승는 이름 지정 방식 등으로 전달합니다
DAB-공항 1
DAB - 공항 (1)
DAB- 공항 1
DAB - 공항 (1)
또는 :
공항 1 DAB
공항 1 -DAB
공항 1 DAB
공항 1 - DAB
당신은 공항 코드, 당신은 무엇을 선택 공항 이름을 사용할 수 있습니다.
그냥 각 공항의 지오 펜스는 같은 탑승권을 참조 기억. 모두 그 이름을, 당신은 당신의 패턴 또는 PIN을 노출 할 필요없이 하늘을 비행 할 수 있습니다!